There is a common question or confusion between endpoint and resource while testing API. Understanding it properly will improve the idea of not only testing it but also to improve the communication more technically to the team I found a great explanation from a user on stackoverflow. Thought to write it down here.
The terms resource and endpoint are often used synonymously. But in fact they do not mean the same thing.
The term endpoint is focused on the URL that is used to make a request. The term resource is focused on the data set that is returned by a request.
Now, the same resource can often be accessed by multiple different endpoints. Also the same endpoint can return different resources, depending on a query string.
Let us see some examples:
Different endpoints accessing the same resource Have a look at the following examples of different endpoints:
/api/companies/5/employees/3 /api/v2/companies/5/employees/3 /api/employees/3 They obviously could all access the very same resource in a given API.
Also an existing API could be changed completely. This could lead to new endpoints that would access the same old resources using totally new and different URLs:
/api/employees/3 /new_api/staff/3 One endpoint accessing different resources If your endpoint returns a collection, you could implement searching/filtering/sorting using query strings. As a result the following URLs all use the same endpoint (/api/companies), but they can return different resources (or resource collections, which by definition are resources in themselves):
Most of the testing in API requires authentication and we need to pass it in every request we make. Similarly there can be any other dynamic authorization/authentication mechanism which needs to be passed along with header or as parameter. What becomes problem is every time we generate access token from one endpoint (EX: token endpoint) and copy the token and paste in another request as header or body parameter. There is a simpler way to handle this by transferring the token from one request to another request via a variable.
POSTMAN supports javascript based Test scripts where we can write code snippet to do the above.
Use case: 1- Call token endpoint using some valid credentials 2- Get the token from response and store in a variable 3- Use the token variable in another request
pm.test("Fetch Token and Set", function () {
    var jsonData = pm.response.json();
    pm.globals.set("token_global", jsonData.access_token);
   });
The above code can be added in Test tab of POSTMAN. It will store the response in a variable. Then it will extract the value from the key access_token from response and set in the variable token_global * Please note that you need to create a global variable named token_global.
Token EndpointToken from above is used in this request
Notice that the token generated in step 1 is used in step 2. Highlighted the token to show the token value are same.
Many at times we need to use different content types , headers , parameters while working with different API testing. Today i have figured out a way how to send a different content type as x-www-form-urlencoded for a POST request.
For one my project we have to generate access token using content type as x-www-form-urlencoded and I found it difficult to send it from rest assured or Karate code. However it was easy to send the same request using POSTMAN.
Finally after a lot of trial and error and search over google I found a solution.
USE CASE: 1- Make a POST request 2- Set contet-type as x-www-form-urlencoded in Body (Hence there will be no body content for this content type, only it will have related form parameters) 3- Set 3 parameters for the above content-type – grant_type : password – username: abcd – password: abcd
Sample request in POSTMAN
Now I have done the above request using KARATE API as below.
Feature: To test Authentication API using x-www-form-urlencoded
Scenario: Generate access token
	Given url 'https://login-qa.mywebsite.com/api/v1/token'
	And header Content-Type = 'application/x-www-form-urlencoded'
	And form field username = 'user_ppr_test01@yopmail.com'
	And form field password = 'Test@12345'
	And form field grant_type = 'password'
	And request {}
 	When method post
 	Then status 200

Output:
1 < 200
{"access_token":"5bb73fc5-6e69-43b6-931d-eb80c87a2cc9","token_type":"bearer","expires_in":1799}
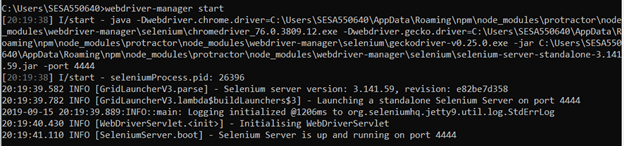
Setup Proxy(Option 1:Command line): npm config list (This will list the current user config in C:/Users/{UserName}/.npmrc file) Ex: ; userconfig C:UsersSESA550640.npmrc
WebDriver install webdriver-manager status ( Will list the status of WebDrivers)
7.webdriver-manager update It will be installed under below Dir: C:UsersSESA550640AppDataRoamingnpmnode_modulesprotractornode_modules webdriver-manager
You might get below error due to proxy: Error: connect ETIMEDOUT 172.217.163.80:443 [11:27:15] E/start – Selenium Standalone is not present. Install with webdriver-manager update –standalone
Write a test Open a new command line or terminal window and create a clean folder for testing.
Protractor needs two files to run, a spec file and a configuration file.
To begin with we can copy sample example_spec and conf.js from Protractor installation path. When we install protractor these sample files come along with it. C:UsersusernameAppDataRoamingnpmnode_modulesprotractorexample
or
Create a spec file: firstTest_spec.js
describe('angularjs homepage todo list', function() {
  it('should add a todo', function() {
    browser.get('https://angularjs.org');

    element(by.model('todoList.todoText')).sendKeys('write first protractor test');
    element(by.css('[value="add"]')).click();
var todoList = element.all(by.repeater('todo in todoList.todos'));
    expect(todoList.count()).toEqual(3);
    expect(todoList.get(2).getText()).toEqual('write first protractor test');

    // You wrote your first test, cross it off the list
    todoList.get(2).element(by.css('input')).click();
    var completedAmount = element.all(by.css('.done-true'));
    expect(completedAmount.count()).toEqual(2);
  });
});
The describe and it syntax is from the Jasmine framework. browser is a global created by Protractor, which is used for browser-level commands such as navigation with browser.get.
Now run the test with ( Assuming that both the spec file and conf file are in same location, else provide the absolute path of spec file in conf file. Ex: specs: [‘Testcases//example.js’] or specs: [‘..//Testcases//JasmineFeatures_spec.js’] protractor conf.js
If you get below error: Unable to create new service: ChromeDriverService
Try updating chromedriver :
webdriver-manager update --chromedriver
If you using Visual Studio Code then I recommend installing below plugins: 1- Typescript hero 2- javascript 3- Protractor Test Runner (Enables to run .ts file directly) 4- Since protractor comes with Jasmine out of the box, but if it is installed globally, then VS Code intellisense (code completion) might not work properly. Run below code to enable it. npm i @types/jasmine 5- Gauge ( for writing better reusable code) 6- Cordova ( AI code completion )
While working with POSTMAN , we need to validate many headers and values as part of API testing. We can validate API response and Headers using javascript under TEST tab. Please note that POSTMAN comes with two variants: 1- Chrome extension (Deprecated but still can be used) 2- Desktop application (Recommended)
We will discuss the examples in both variants.
1- Validate a header has expected value
//POSTMAN Desktop App
pm.test("Cache-Control is correct", function() {
   pm.response.to.be.header("Cache-Control", "no-cache");
});

//POSTMAN - Extension
tests["Cache-Control is correct"] = postman.getResponseHeader("Cache-Control","no-cache");
2- Validate Header is present
//POSTMAN Desktop App
pm.test("Cache-Control is present", function() {
   pm.response.to.have.header("Cache-Control");
});

//POSTMAN - Extension
tests["Cache-Control is present"] = postman.getResponseHeader("Cache-Control");
While working with extracting data from JSON , we feel the need of expression which helps us to fetch the data from a complex JSON with conditions.
Based on the conditions and logic we provide, it will return the data if the condition matches.
It is indeed very helpful and must have feature in our API testing. Jayway jsonpath is the best solution this.
Head on to this beautiful website which helps you filter JSON using JsonPath expression: https://jsonpath.com/?
For more information about the library that we will use here is below: https://github.com/json-path/JsonPath Check the instructions on how to implement in your java project.
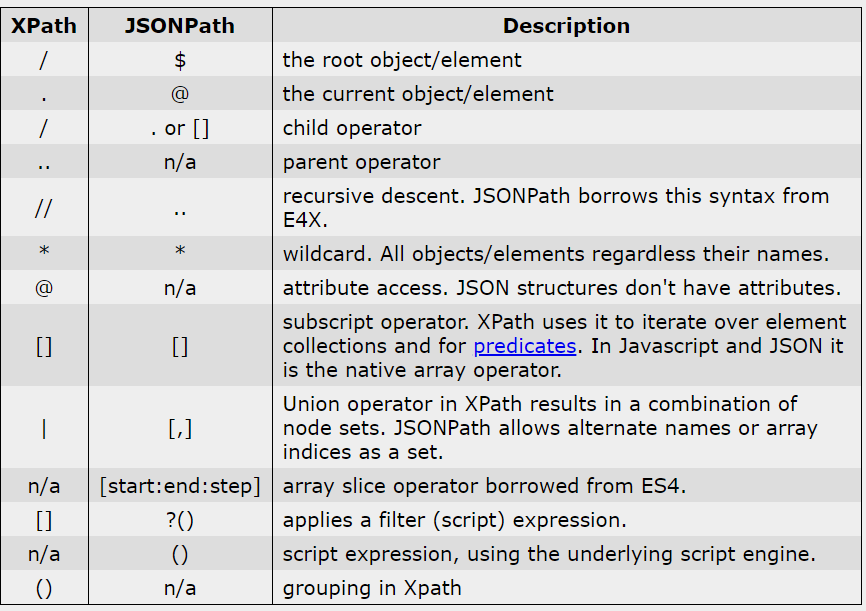
About the expression: JSONPath expressions always refer to a JSON structure in the same way as XPath expression are used in combination with an XML document. Since a JSON structure is usually anonymous and doesn’t necessarily have a “root member object” JSONPath assumes the abstract name $ assigned to the outer level object.
JSONPath expressions can use the dot–notation $.store.book[0].title
or the bracket–notation $[‘store’][‘book’][0][‘title’]
There many locators in selenium.
Based on scenarios we use one of those.
Here are the list of locators:
id, name , css selector, linkText, partialLinkText, Xpath
Sequence as per the choice of faster execution: 1- id 2- name 3- css 4- xpath 5- linkText 6- partialLinkText
Most widely used locators are xpath and css (If id and name is not present) Between xpath and CSS, css is more faster and more reliable due to below reasons:
1- xpath has different engines for different browsers, where as CSS is same for all browsers 2- CSS is best suited for IE browser than xpath 3- Xpath can traverse backward/froward direction in DOM elements but css can only find forward direction(disadvantage)
// : Select current node.
Tagname: Tagname of the particular node.
@: Select attribute.
Attribute: Attribute name of the node.
Value: Value of the attribute.
XPATH examples: 1- //div[@class=’somename’]/table/td 2- //a[text()=’sometext’] 3- //table/tr/td/label[contains(.,’sometext’)] 4- //table/tr/td/label[contains(text,’sometext’)] 5- //*[@type=’submit’ or @name=’btnReset’] 6- //input[@type=’submit’ and @name=’btnLogin’]
<bookshelf>
        <book>
                <title>The Great Adventure</title>
                <author>J.K.Miller</author>
                <pages countingCover="true">360</pages>
                <publisher>B and B</publisher>
        </book>
        <book>
                <title>On the Way</title>
                <author>J.Johnson</author>
                <pages countingCover="true">2135</pages>
        </book>
        <book>
                <title>The Silent Rage</title>
                <author>Thomas B.</author>
                <pages countingCover="false">530</pages>
        </book>
</bookshelf>
//title/ancestor::book – returns all books within its ancestors
//book/ancestor-or-self::book
//book/following::book – following nodes after the context node only
//title/following-sibling::author – following sibling
//book/child::title
//title/preceding::book – before book node
//title/parent::book – all parent nodes
//book/descendant::title – all parent,child, grandchild below the node
CSS locators:
^ - Starts with
input[id^='cb-select']

$ -  Ends with
input[id$='319']

# id
input#cb-select-319
or
input[id='cb-select-319']

.  class
input.class_name

* contains
input[id*='login']