Sometime while working with a project , we come in a situation where we see that some files or folders are being tracked but later we do not want them to be tracked.
It might be possible that while creating .gitignore file we forgot to add those files/folders pattern.
Such examples are : target folder, custom folders lke log,report etc which we add later after we create .gitignore.
So we can tell git to stop tracking for these files for any changes made in future but still want these to remain in out local, so that we can work with them locally without any issues. The solution is :
Step1: execute below command in git bash or command line while within the same project dir. This will tell git that these are deleted and git will stop tracking ( Tricking git)
Step2: Add those folder/file in .gitignore too. So that in future even these files or folders being created or mistakenly added, still it will be ignored by git.
Step3: Now commit these changes and push. (1-deletion of excluded folder/file and 2-updation .gitignore)
Check this article if you want to know more about what files to ignore.
It is important to validate the JSON response schema while doing API testing. There are many reasons for this:
If any fields in json response changes it will detect the change
If any data type of any field is changed, it will detect the change
If any contract is changed it will detect the change
Hence it is always important to have this check in place. We will take this example in the popular tool POSTMAN.
Most of us use POSTMAN while testing API and POSTMAN has the capability to run automated checks.
Here is how we can validate json schema:
Step1: Get the response json and convert it into schema using online json to schema converter tool Lets take an example of below simple json response of Auth token.
Go to https://jsonschema.net/ and paste the json in the left text box. Make sure to select setting and check the Numeric as JSON type. It will convert numeric as number not as integer.
Then save and click on submit button.
Step2: Copy the generated Schema
Step3: Go to Postman and go to the request – Test tab.
var Ajv = require('ajv'),
    ajv = new Ajv({logger: console}),
    schema = {
    "$schema": "http://json-schema.org/draft-07/schema",
    "$id": "http://example.com/example.json",
    "type": "object",
    "title": "The Root Schema",
    "description": "The root schema comprises the entire JSON document.",
    "default": {},
    "additionalProperties": true,
    "required": [
        "access_token",
        "token_type",
        "expires_in"
    ],
    "properties": {
        "access_token": {
            "$id": "#/properties/access_token",
            "type": "string",
            "title": "The Access_token Schema",
            "description": "An explanation about the purpose of this instance.",
            "default": "",
            "examples": [
                "cd42f000-9905-4971-840b-a66fa9dac4a4"
            ]
        },
        "token_type": {
            "$id": "#/properties/token_type",
            "type": "string",
            "title": "The Token_type Schema",
            "description": "An explanation about the purpose of this instance.",
            "default": "",
            "examples": [
                "bearer"
            ]
        },
        "expires_in": {
            "$id": "#/properties/expires_in",
            "type": "number",
            "title": "The Expires_in Schema",
            "description": "An explanation about the purpose of this instance.",
            "default": 0,
            "examples": [
                1799.0
            ]
        }
    }
};

pm.test('Schema is valid', function() {
    var data = pm.response.json();
    pm.expect(ajv.validate(schema, data)).to.be.true;
});
Once this code snippet is pasted in postman, hit send request button. it will validate and result in Pass in Test result tab of response.
Recently I came across a great article by Roman Savin from qatutor.com. Amazingly and simply explained the difference between QA and Tester. Note than QA and Tester is interchangeably used in today’s Testing world, but there is a difference and it makes a lot of sense.
Example
A certain Mr. G. realized one day that his life was boring and uneventful, so he left his wife and their little son. In order to spice up his existence, he moved to another city and started all over. Many years passed. One day his ex-wife calls him and asks him to influence his twelve-year-old son who has started to smoke, has been caught at the movies ditching math class, and has made several futile yet confident attempts to kiss his neighbor Jessica. The situation appears to require a father’s firm hand.
The QA approach would be if ex-husband never left his wife and raised their son, trying to prevent bad seeds in son’s behavior.
The testing approach occurs when the ex-husband
compiles a list of issues like: “actual: movie; expected: math”
locks the little rascal in a mountain cabin, limiting his spiritual and sexual life to French literature of XIX century
hires private tutors who are supposed to look at the list and mold the boy to make sure that all the issues on the list are dealt with
Brain positioning
The purpose of QA is to prevent bugs
The purpose of testing is to find and address bugs that have not been prevented
It is important to check session and local storage while testing web browser functionalities. As part of test automation, sometimes we feel the need of getting certain data from session or local storage.
For example: access token can be obtained from the browser session or local storage.
There different ways to do that using Selenium.
1- Using Augmenter
//import packages
import org.openqa.selenium.WebDriver;
import org.openqa.selenium.html5.LocalStorage;
import org.openqa.selenium.html5.SessionStorage;
import org.openqa.selenium.html5.WebStorage;
import org.openqa.selenium.remote.Augmenter;

WebDriver driver = new ChromeDriver();
WebStorage webStorage = (WebStorage) new Augmenter().augment(driver);

// using local storage
LocalStorage localStorage = webStorage.getLocalStorage();
localStorage.setItem("key1","value1");
localStorage.getItem("token");
driver.navigate().refresh();

// using session storage
SessionStorage sessionStorage = webStorage.getSessionStorage();
sessionStorage.setItem("key1","value1");
sessionStorage.getItem("token");
driver.navigate().refresh();
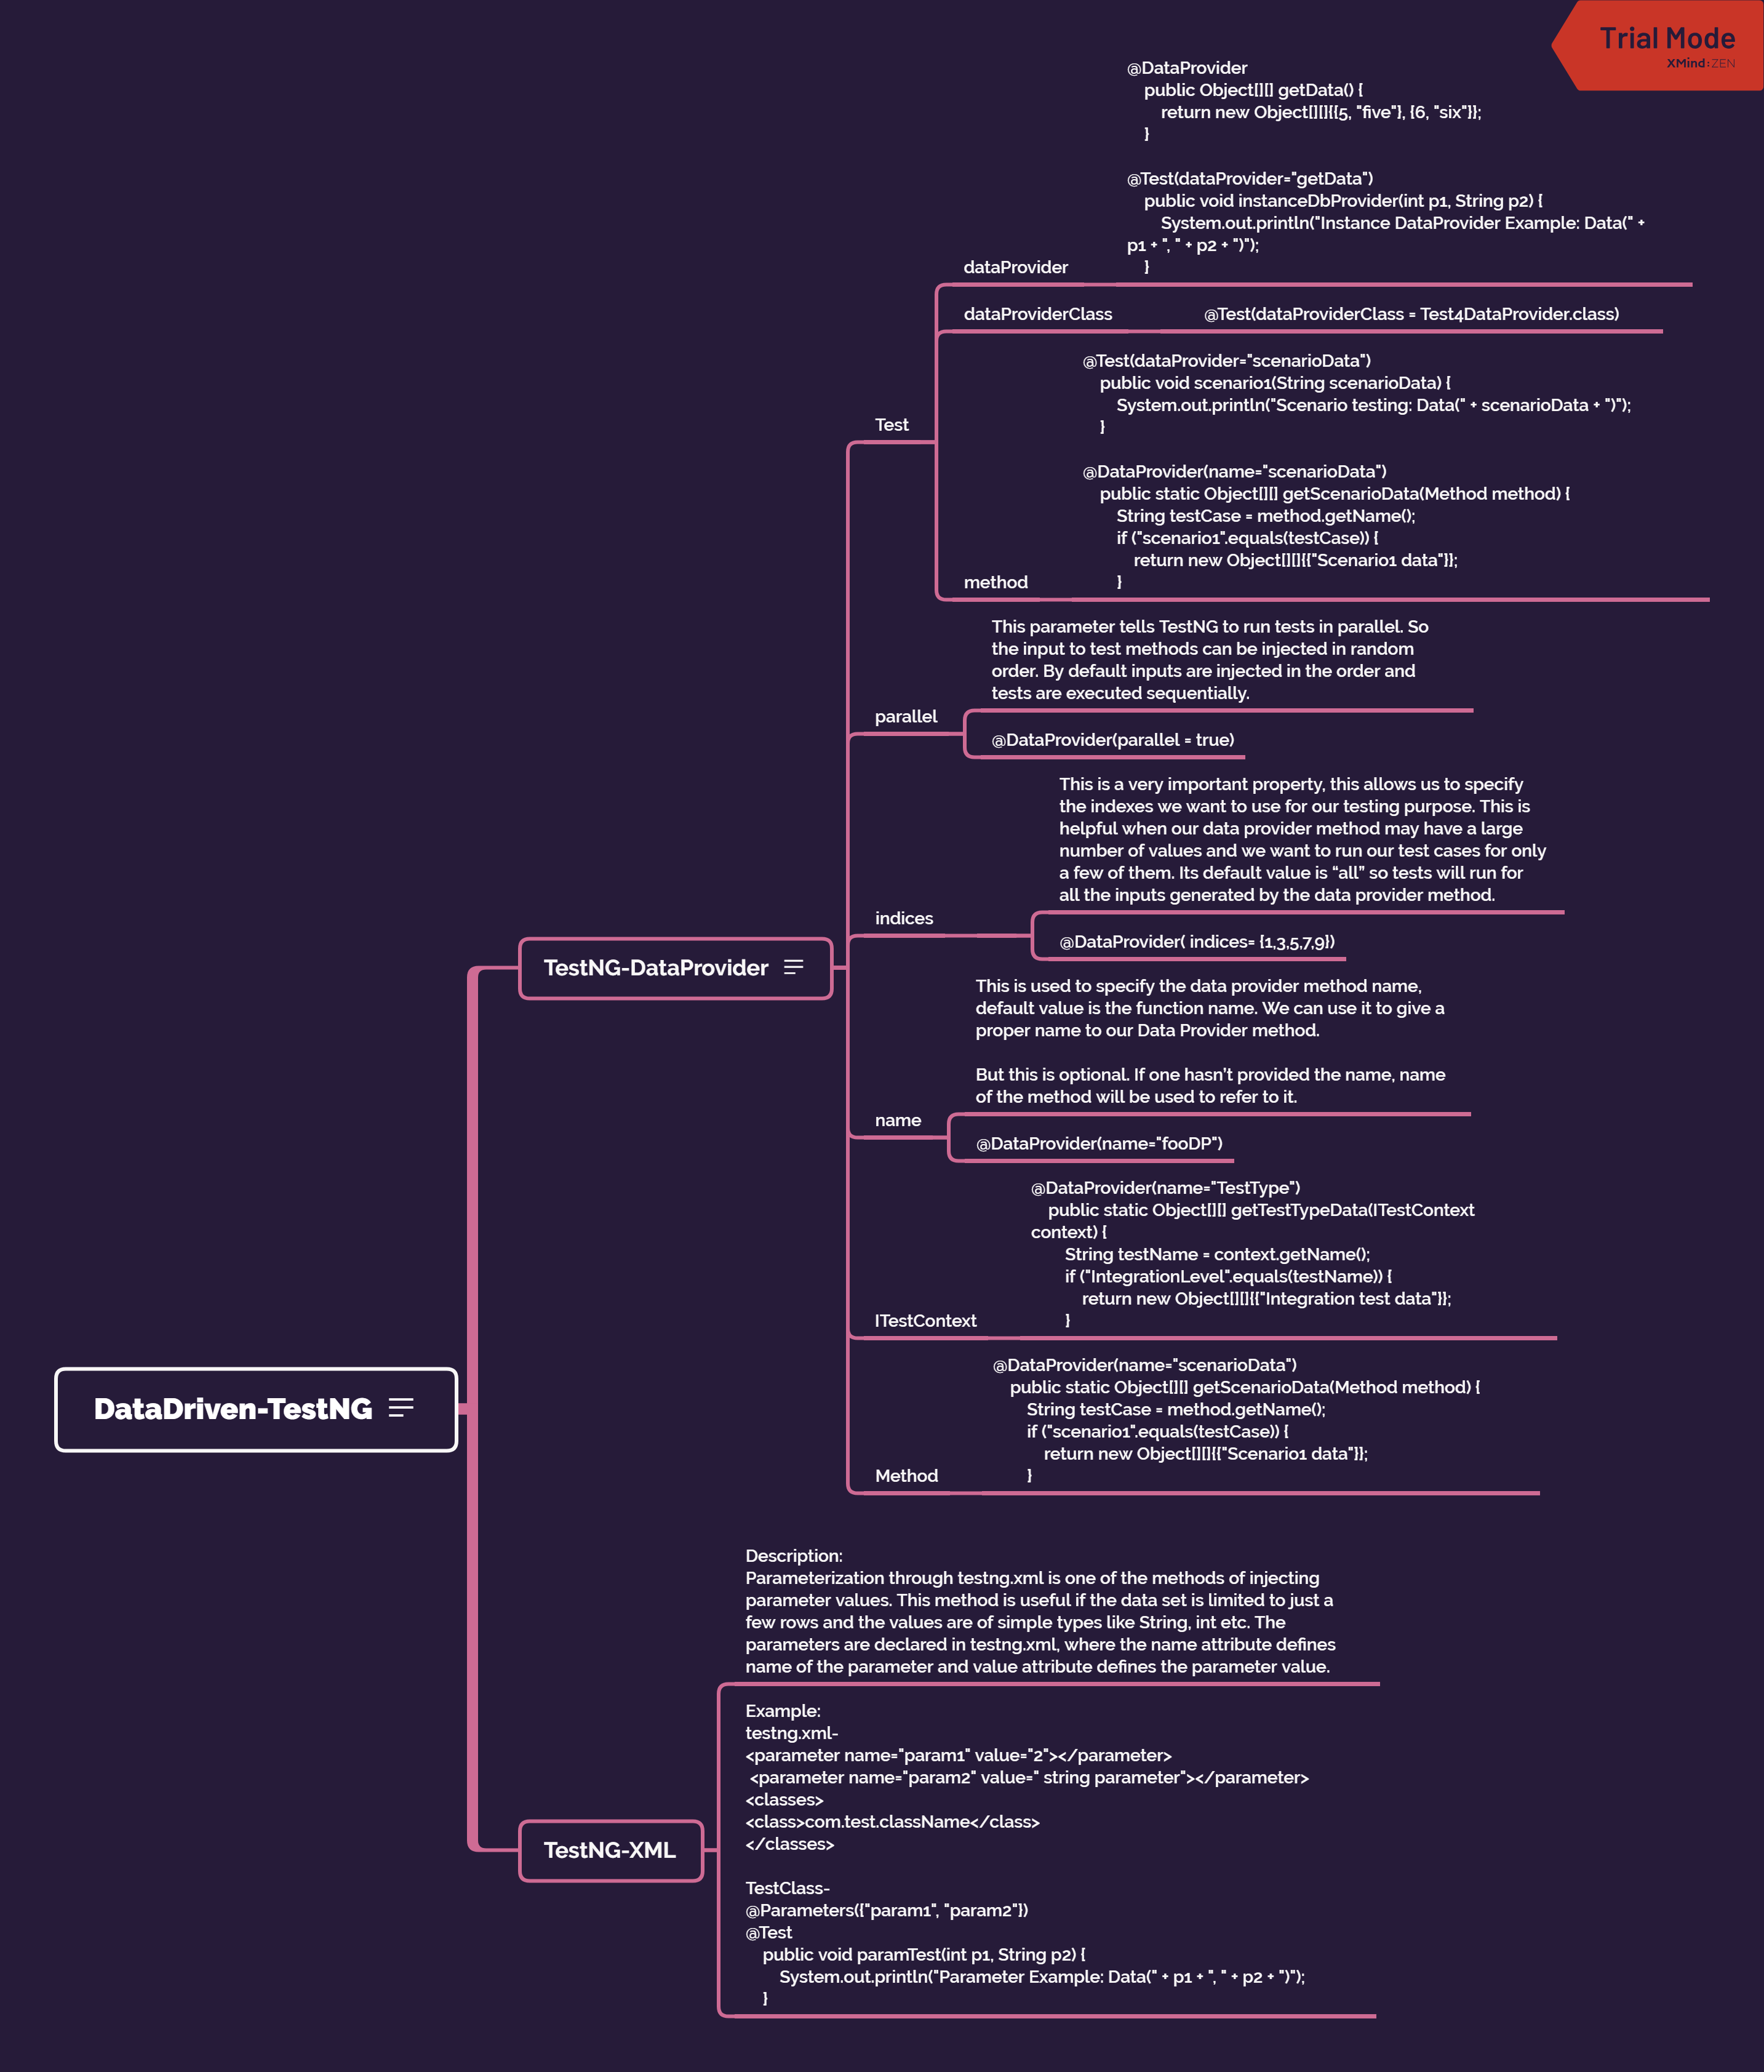
TestNG supports two different ways of injecting parameter values. Parameterization through testng.xml DataProvider
There is also the factory way where we create multiple instances of the test class with different constructor data.
TestNG-DataProvider
If you want to provide the test data, the DataProvider way, then we need to declare a method that returns the data set in the form of two dimensional object array Object[][]. The first array represents a data set whereas the second array contains the parameter values.
The DataProvider method can be in the same test class or one of its super classes. It is also possible to provide DataProvider in another class but then the method has to be static.
Test
Data provider
//Data provider without name: It will take the method name
@DataProvider
public Object[][] getData() {
return new Object[][]{{5, "five"}, {6, "six"}};
}

//Data provider with name
@DataProvider(name="loginData")
public Object[][] login() {
return new Object[][]{{5, "five"}, {6, "six"}};
}
Using the Data provider present in same class in Test
This parameter tells TestNG to run tests in parallel. So the input to test methods can be injected in random order. By default inputs are injected in the order and tests are executed sequentially.
@DataProvider(parallel = true)
indices
- This is a very important property, this allows us to specify the indexes we want to use for our testing purpose. This is helpful when our data provider method may have a large number of values and we want to run our test cases for only a few of them. Its default value is “all” so tests will run for all the inputs generated by the data provider method.
- @DataProvider( indices= {1,3,5,7,9})
name
This is used to specify the data provider method name, default value is the function name. We can use it to give a proper name to our Data Provider method.
But this is optional. If one hasn’t provided the name, name of the method will be used to refer to it.
@DataProvider(name=”fooDP”)
ITestContext
@DataProvider(name=”TestType”) public static Object[][] getTestTypeData(ITestContext context) { String testName = context.getName(); if (“IntegrationLevel”.equals(testName)) { return new Object[][]{{“Integration test data”}}; }
Method
@DataProvider(name=”scenarioData”) public static Object[][] getScenarioData(Method method) { String testCase = method.getName(); if (“scenario1”.equals(testCase)) { return new Object[][]{{“Scenario1 data”}}; }
TestNG-XML
Description:
Parameterization through testng.xml is one of the methods of injecting parameter values. This method is useful if the data set is limited to just a few rows and the values are of simple types like String, int etc. The parameters are declared in testng.xml, where the name attribute defines name of the parameter and value attribute defines the parameter value.